DevStack Setup
I would like to share how to install OpenStack on your local VirtualBox using DevStack. Here are the steps as below. Hopefully you follow these steps to set up your own first OpenStack environment.Contents
- 2 Step 2: Preparation
- 3 Step 3: Set up DevStack
- 4 Step 4: Modified Network Configuration
- 5 Step 5: Trouble Shooting
Step 1: Pre-requisition
Set up linux box


Set up Ubuntu machine

You have to put password and confirm again

Run around 20-30 minutes, depending on download speed.


VMnet0 is for bridge


Regarding ending message; try username: admin and password: e.g: admin and secret


I tried ubuntu-12.04.4-server-amd64.iso, which you can get from here: http://releases.ubuntu.com/12.04/
Lunch Virtual Box, and add new drive for iso.
Set up Ubuntu machine
Login and run the commands below.
 sudo locale-gen en_US
 sudo apt-get -y update
 sudo apt-get -y upgrade
 sudo apt-get -y install git
 sudo apt-get install -q -y python-all-dev curl dos2unix aptitude python-setuptoolS
 sudo apt-get install -q -y python-pip
 sudo apt-get install apache2
 sudo apt-get install apache2.2-common
 sudo apt-get install -q -y build-essential swig
 sudo ufw disable
 sudo apt-get install libmysqlclient-dev
Make sure you set up proxy if you are in office.

Step 2: Preparation
2.1 add user: stack
sudo adduser stack
You have to put password and confirm again
sudo apt-get install sudo -y || yum install -y sudoecho "stack ALL=(ALL) NOPASSWD: ALL" >> /etc/sudoers
PS: can #sudo vi /etc/sudoers
Insert the line "stack ALL=(ALL) NOPASSWD: ALL”

sudo su stack
sudo mkdir -p /opt/workspace
sudo chown -R stack:stack /opt/workspace
pushd /opt/workspace
sudo apt-get install git -y || yum install -y git
sudo git clone https://github.com/openstack-dev/devstack.git
sudo apt-get install git -y || yum install -y git
PS: if you can’t download, disconnect LAN and use direct wireless and refresh network connection
Step 3: Set up DevStack
cd opt/workspace/devstack
       sudo cp samples/local.conf local.conf
       sudo vi local.conf
 localrc
       FLOATING_RANGE=192.168.1.224/27
       FIXED_RANGE=10.11.12.0/24
       FIXED_NETWORK_SIZE=256
       FLAT_INTERFACE=eth0
       ADMIN_PASSWORD=secret
       MYSQL_PASSWORD=secret
       RABBIT_PASSWORD=secret
       SERVICE_PASSWORD=secret
PS: if you set up proxy, it’s better connect to company LAN and refresh connection
sudo chown -R stack:stack /opt/workspace/devstack
sudo su stack ./stack.sh
Run around 20-30 minutes, depending on download speed.
After installation, shut down machine
sudo shutdown –P now
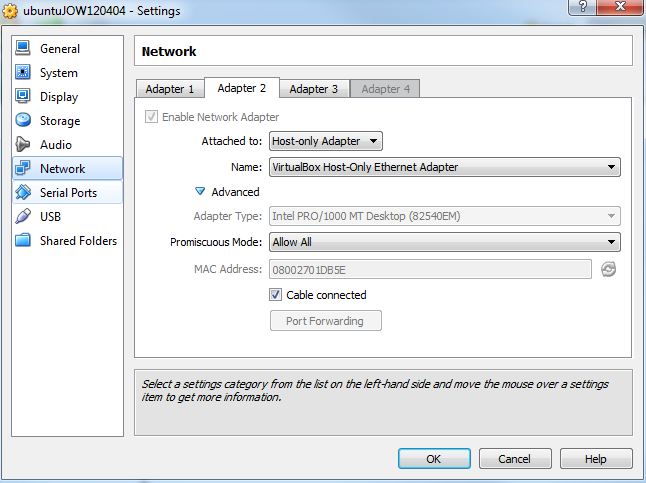
Step 4: Modified Network Configuration
Set up three network adapters
- Change adapter 1 from NAT to Bridge
- Add local host adapter
- Add NAT
Set up Network Adapter, ref: http://docs.openstack.org/training-guides/content/lab000-virtualbox-basics.html
VMnet0 is for bridge
VMnet1 is for host only
VMnet2 is for NAT

Boot the VM
Log in and cd to devstack directory
sudo su stack
cd /opt/workspace/devstack
sudo su stack ./unstack.sh
sudo su stack ./stack.sh
Regarding ending message; try username: admin and password: e.g: admin and secret
Step 5: Trouble Shooting
PS: refresh network connection
General networking restart
sudo /etc/init.d/networking restart
NIC restart (on the console - ie: not remotely):
ifdown eth0
ifup eth0
PS: if there is an error from nova login
HTTPConnectionPool(host='192.168.1.12', port=8774): Max retries exceeded with url: /v2/70a04e8259b04717bf1bdd4faaedbc0c/extensions (Caused by <class 'socket.error'>: [Errno 111] Connection refused)
Since it’s all in one DevStack, the worst case is run stack.sh again
sudo su stack ./stack.sh
after reboot your Ubuntu, you need to run script
sudo su stack ./rejoin-stack.sh
to start services
Hopeful you have fun for this sharing.
No comments:
Post a Comment